AutoSync v5 Developer Manual
Table of Contents
- Version Compatibility
- About ManualSync
- Setup Guide
- Manual Sync Settings
- Features and Functionalities
- Process Flow of ManualSync
- Frequently Asked Questions
- Software Change Log
Version Compatibility
The table below shows the minimum version of the Manual Sync application, database, and test case specification compatible with the version of this document.
| System Document | Test Case Specification | Manual Sync | Database |
|---|---|---|---|
| 1.0 | 1.0 | 5.0.1.15 | 2.9 |
The Test Case Specifications document can be found on this link.
About ManualSync
System Summary
Autosync v5, also called as ManualSync, is faster and more reliable that its previous version, Autosync v4, where the syncing speed is slower because it is reliant to Hamachi that directly connects and sends files to the database of other servers. In ManualSync, the syncing process is not affected even without the Hamachi.
Users can perform the syncing and database backup even at the idlest time of the day, so this will not affect the traffic of system usage. In this version, users can now select the folder or drive they want the backup database to be stored.
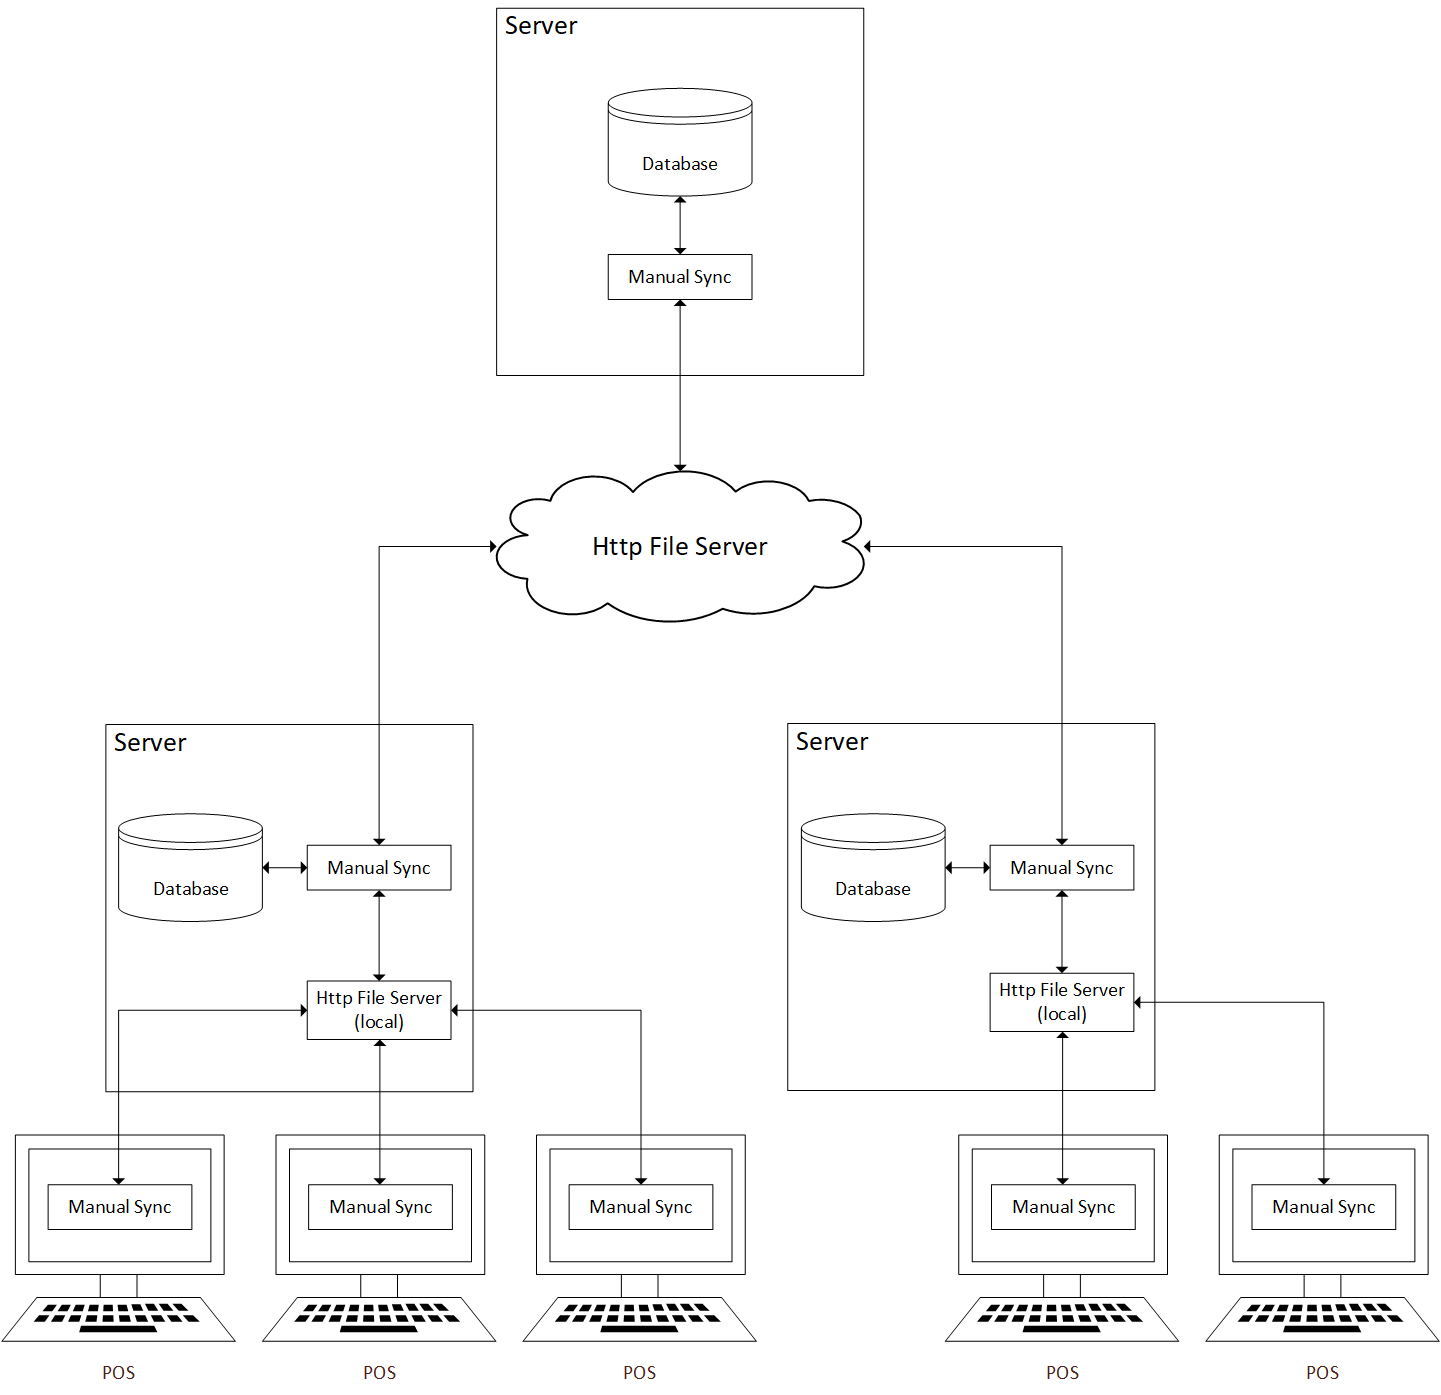
The Http File Server receives files from one server and then sends those files to another server through the Manual Sync software. The Http File Server provides the size of the files to be downloaded when requested by servers through the Manual Sync.
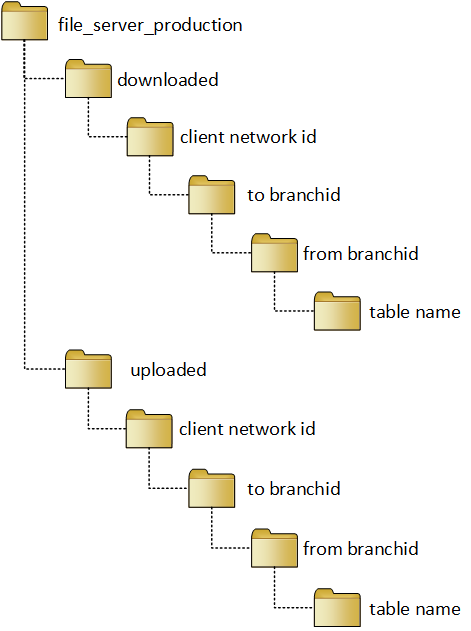
In the server where the HTTP File Server is hosted, there is a folder 'file_server_production' where the files of all clients are stored. The HTTP File Server creates a directory hierarchy which separates each client network and their files using the branch's client network id.
Inside the file_server_production is the ‘downloaded’ and ‘uploaded’ folders. These folders contain the client network id folders where each of them consists of ‘to branchid’ folders. Then, the ‘to branchid’ folders contain the ‘from branchid’ folders that consist of folders of every table downloaded/uploaded.
The structure of directory hierarchy is shown below:
One of the issues encountered with Http File Server is full storage. Folders already downloaded from the server are deleted to have more storage space for files since they are only necessary for back tracking purposes incase issues are encountered.
System Requirements
Below are the dependencies needed for the latest version of Manual Sync to work properly:
- Target Framework: .NET Framework 4.5.2
- Platform Target: Any CPU, 32-bit or 64-bit (64-bit is preferred)
- Operating System: Windows Vista SP2 or later (Windows 7 or later is preferred)
- Packages & Libraries:
- Newtonsoft.Json v9.0.1
- RestSharp v105.2.3
- ObjectListView.Official v2.9.1
- NUnit v3.5.0
- NSubstitute v1.10.0
- MySql.Data
- Ionic.Zip
- ApplicationUpdater
The following are the safest minimum hardware requirements for Manual Sync:
- 4GB RAM
- i3 processor
- At least 240GB of hard disk capacity
Setup Guide
This section shows how to setup the Manual Sync application before using it.
- If both server and POS are using Manual Sync:
- Download the HttpFileServer folder from this link: https://trello.com/c/PCEtGuOc/27-manual-sync-setup
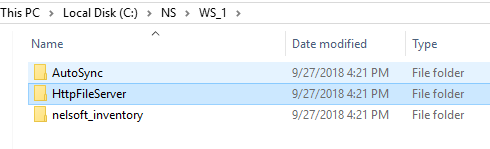
- Transfer HttpFileServer in server folder of current branch. See image below.
- Open the HttpFileServer folder. Then, go to config folder.
- Open config.json. Change directory to D:
- Go to drive D and create new folder named "FileServerRoot"
- On HTTPD-vhosts.conf, add virtual host port 79 root path: C:\NS\WS_1\HttpFileServer\public
- Add Listen 0:0:0:0:79 on HTTPD.conf
- Restart apache.
- Change settings of SERVER and POS.
- For Terminal File Server Hostname, the format should be like this: <TerminalFileServerHostname>[server's computer name:79]</TerminalFileServerHostname>
NOTES:
- Test if the port number used is working and available.
- For FileServerRoot folder, you can use any drives available but don't forget to change the config settings in HttpFileServer. Also, do not use drive C as much as possible.
Manual Sync Settings
This section shows the settings of Manual Sync in the xml file. Each setting is discussed, and the values are specified that are needed for it to work.

Figure 1: A sample screenshot of the Settings xml file that shows the first few settings.
- <ClientNetworkID> - This refers to the client’s network id that can be found on Nelsoft’s client base.
- <BranchId> - This refers to the branch id that you are using in your unit/computer.
- <TerminalNumber> - This refers to what terminal you are currently in. If the value is “0”, it means you are the server. If it is another value, it means you are the POS terminal.
- <Server> - This refers to the name or IP address of your server host.
- <Database> - This refers to the database name that you are using in your web system and POS, if you have any.
- <Port> - This refers to the TCP/IP port of your server host.
- <Username> - This refers to the username to be used by ManualSync as credentials to connect to the database. The default value is “root”.
- <Password> - This is the encrypted password of your database connection.
- <ProductSyncMode> - This refers to the syncing of products’ branch price in the main branch and the sub-branches. If the value is “1”, all products’ branch price are only synced from the main branch. If the value is “2”, other branches can sync their own branch prices to other branches. Important: The value should be the same with all branches' settings. The "Rollback: Successful" error can occur if one branch tries to send files to another branch that has a different product sync mode value.
- <BackupTime> - This refers to the time in 24-hr format that the ManualSync will back up your data. This can have multiple values by separating them by comma. Example: 10:00, 20:00
- <InitialBackupDirectory> - This refers to the initial path where the backup database will go to.
- <BackupDirectory> - This refers to the directory where the backup will be copied to. It is recommended to input a directory found in a different drive.
- <MaxBackupCount> - This refers to the maximum backup file count to be stored. Once it reaches the count, ManualSync will delete the oldest created backup file.
- <DataDirectory> - This refers to the folder path for storage of ManualSync generated files pending to be uploaded or patched. It is advised to place the path in \ProgramData\Autosync but in different drive (if there are any) aside from drive C:
- <FileServerHostname> - This refers to the http file server address that you need for syncing and for uploading or downloading data from branch to another branch. The hostname to be used is “sync.crims.ph”.
- <FileServerUsername> - This refers to the http file server username for authentication to access the file server address. The username to be used is “nelsoft”.
- <FileServerPassword> - This refers to the http file server encrypted password for authentication to access the file server address.
- <FileServerRoot> - This refers to the directory in the cloud server where the http file server is hosted, where the data are uploaded to or downloaded from.
(Important: The directory that all clients are using is named "file_server_production". NEVER use that directory for testing as it can affect the clients data immediately and it is impossible to track or fix the issues that can occur.)
- <TerminalFileServerHostname> - This refers to the http file server address that you need for syncing from POS to server and for uploading or downloading data.
- <TerminalFileServerUsername> - This refers to the http file server username for authentication to access the terminal address for syncing POS to server.
- <TerminalFileServerPassword> - This refers to the http file server encrypted password for authentication to access the terminal address for syncing POS to server.
- <TerminalFileServerRoot> - This refers to the directory in the local server where the http file server is hosted, where the data are uploaded to or downloaded from.
(Important: The directory that all clients are using is named "file_server_production". NEVER use that directory for testing as it can affect the clients data immediately and it is impossible to track or fix the issues that can occur.)
- <SyncMode> - This determines whether the sync mode will be Auto or Manual. If the input is "0", the sync mode is 'Auto' that enables the software to automatically send or receive the files in the branch. The sending/receiving of files happens every five minutes. If the input is “1”, the sync mode is ‘Manual’ which is the default mode.
- <ManualSyncMode> - This turns on or off the function of combining ‘generate’ and ‘upload’ processes as “Send”, and ‘download’ and ‘patch’ processed as “Receive”. This is an optimization that fixes corrupted data issues. If the input is “0”, this turns the function off which separates the said processes. If the input is “1”, this turns the function on which combines the said processes.
- <BranchesToSync> - This refers to the branch id of the branches you want to sync. If there is no value, this setting is considered off.
- <SuperadminMode> - This changes the mode of ManualSync into superadmin mode if you input “1”. (NOTE: This setting is currently disabled.)
- <LogPatcherQueries> - This enables or disables the creation of log for queries that will be run on database during the generation process in the ManualSync application. If the input is “0”, this disables the creation of log per day. If the input is “1”, this enables the creation of log per day. The queries will be placed in a file named queries.txt.
- <MasterKey> - This refers to the encrypted password that can be used in back-up database, manual re-sync, reset inventory and recompute inventory, and can be used to access other features in the application. This can be changed in the Password Settings in the application under the Settings tab. The default value is “admin”. The hardcoded value is 121586.
- <BackupKey> - This refers to the encrypted password that needs to be entered when you manually backup the database. This can be changed in the Password Settings in the application.
- <ManualResyncKey> - This refers to the encrypted password that needs to be entered when you choose to manual resync the database. This can be changed in the Password Settings in the application. (NOTE: This setting will be removed on the following version.)
- <ResetInventoryKey> - This refers to the encrypted password that needs to be entered before the ManualSync resets the inventory. This can be changed in the Password Settings in the application.
- <RecomputeInventoryKey> - This refers to the encrypted password that need to be entered before the ManualSync recomputes the inventory. This can be changed in the Password Settings in the application.
- <SkipOutletProducts> - This setting does not include the branchprice with branchid of outlet if the input is “0”. If the input is “1”, it includes the branchprice with outlet branchid. The default value is "0".
- <NotifyLastBackupDays> - This is used to set how many days when to display the notification of backup database.
- <AutoBackup> - If the value is 1, this setting forces to back up the database even if there is no value in Backup Time setting.
Features and Functionalities
Main Features
The buttons on the main user interface of ManualSync can be changed by changing the value of ManualSync Mode in the Settings xml file. If the value is 0, the UI will show you the Generate, Upload, Download, and Patch buttons. If the value is 1, the UI will show the Send and Receive buttons. It is recommended to use Manual Sync Mode = 1 because data can get corrupted when using the Manual Sync Mode = 0.
Below is the UI of Manual Sync if the <ManualSyncMode> is set to 0:

- Manual Sync Menu Bar
- File - This shows the access to the exit button, and force restart button if the <SyncMode> is set to 0 in Settings.
- Tools - This contains the following functions:
- Backup Database - This is used when the user wants to manually backup the database.
- Reset Inventory - This resets the inventory of all products to zero. This function only works on the current branch id.
- Recompute Inventory - This function recomputes all data in modules that reflect the inventory of products.
- Settings - This tab has the following settings:
- Backup Settings - This setting is where users can set the backup directory and the maximum backup count.
- Sync Settings - This is where users can set which branches will be synced to and from other branches. For the main branch, this is where users can also set which specific branches will be sent the branch prices to.
- Password Settings - This only shows the settings where users can change the passwords that are used with the major functions in Manual Sync.
- Check Updates - This function, when clicked, checks if there are updates for Manual Sync.
- Database - This shows the list of other branches with their sql server and sql port.
- Generate Status - This shows the data to be generated from your branch.
- Upload Status - This shows the data count that needs to be uploaded from your branch to other branches.
- Download Status - This shows the data count that needs to be downloaded from other branches to your branch.
- Patch Status - This shows the data to be patched to your branch.
- Refresh - This button refreshes and displays the data of all listed branches.
- Generate - This button generates the files to be uploaded from your branch to other branches.
- Upload - This button uploads the generated files to the HTTP file server.
- Download - This button downloads files from the HTTP file server to the unit.
- Patch - This button, when clicked, applies the changes that are in the files to the databaase.
Below is the UI of Manual Sync if <ManualSyncMode> is set to 1:

- Sender Status - This shows the data count that need to be sent from your branch to other branches.
- Receiver Status - This shows the data count that need to be received from other branches to your branch.
- Send - This is the combination of Generate and Upload functions.
- Receive - This is the combination of Download and Patch functions.
- This shows the current version of the application.
- This shows the current branch you are using.
- This shows the terminal number. If the value is 0, the application is for the server. If it's another number, the application is for the POS terminal. This can be changed in the Settings xml file.
Settings
Backup Settings

- Backup Directory - This is the folder path where the backup database will be stored. The default value is C:\dumps.
- Backup Directory 2 - This is the secondary folder path for the backup database. This is only optional to be filled.
- Browse buttons - These buttons let users to easily select the folder path of the backup directory.
- Max Backup Count - This refers to the maximum count the backup database will be saved. The default value is 4.
Sync Settings

- Branches to Sync - This tab lets users select only specific branches to sync.
- Sync Mode - This shows the sync mode of the application. This can be Auto or Manual and can only be changed in the Settings xml file.
- Users can tick this checkbox if they want to sync data only to and from selected branches.
- Branch Prices - This tab only shows in main branch. This tab lets users select only specific branches where they want to send the branch prices of all branches. Branches not selected will receive only the main branch's prices and their own prices.
- Users can tick this checkbox if they want to sync the branch price only on selected branches.
- Branches - These are the branches that users can select in Sync Settings.
Password Settings

- Master Key - This is the password that can be used in all functions in the application that need password. The default value is "admin". The hardcoded value is 121586.
- Backup Key - This is the password to be entered when a user manually backups the database.
- Manual Re-Sync Key - This is the password to be used when a user manually resync the database. NOTE: This setting will be removed on the following version.
Syncing Types
This part shows the direction of syncing of every table in the database.
Branch to Branch:
| Module | Sync Type |
| Product (product sync mode=1) - | Main to Sub |
| Product (product sync mode=2) - | All |
| Brand - | Main to Sub |
| Department - | Main to Sub |
| Category - | Main to Sub |
| Supplier - | Main to Sub |
| Customer - | All |
| Member - | All |
| Member Rate - | All |
| Member Points - | Sub to Main |
| User - | All |
| Bank Account - | Main to Sub |
| Purchase Order - | All |
| Purchase Receive - | All |
| Payment - | Main to Sub & Sub to Main |
| Purchase Return - | Sub to Main |
| Other Payment - | Sub to Main |
| Damaged Product - | Sub to Main |
| Sales and Returns - | Sub to Main |
| Sales Order - | Sub to Main |
| Counter - | Sub to Main |
| Collection - | Main to Sub & Sub to Main |
| Other Receives - | Sub to Main |
| POS Cash Denomination - | Sub to Main |
| Stock Requests - | All |
| Stock Deliveries - | All |
| Product Inventory Adjustment - | Sub to Main |
| Bank Transactions - | Sub to Main |
| Product Price Adjust - | Main to Sub & Sub to Main |
| Department Price Adjust - | Main to Sub & Sub to Main |
| Product Quantity Promotion - | All |
| POS Promotion - | Sub to Main |
| Product Discount - | All |
| Product Branch Inventory - | All |
| Product Transaction Summary - | Sub to Main |
| Branch - | Main to Sub |
Terminal to Server:
| Module | Sync Type |
| Product - | Main to Sub |
| Brand - | Main to Sub |
| Department - | Main to Sub |
| Category - | Main to Sub |
| Supplier - | Main to Sub |
| Customer - | Main to Sub |
| Member - | Main to Sub |
| Member Rate - | Main to Sub |
| Member Points - | Sub to Main |
| User - | Main to Sub |
| Sales and Returns - | Sub to Main |
| Sales and Returns Posd - | Sub to Main |
| Collection - | Sub to Main |
| Collection Posd - | Sub to Main |
| Product Quantity Promotion - | Main to Sub |
| POS Promotion - | Main to Sub |
| Product Discount - | Main to Sub |
| Discount Type - | Main to Sub & Sub to Main |
| POS Cash Denomination - | Main to Sub & Sub to Main |
| POS Readings - | Sub to Main |
| POS Readings Posd - | Sub to Main |
| POS Receipt Settings (db version < 3.1) - | Main to Sub & Sub to Main |
| Terminal - | Main to Sub & Sub to Main |
| Branch - | Main to Sub |
| Approval Logs (db version >= 3.8) - | Sub to Main |
Process Flow of ManualSync
General Flow
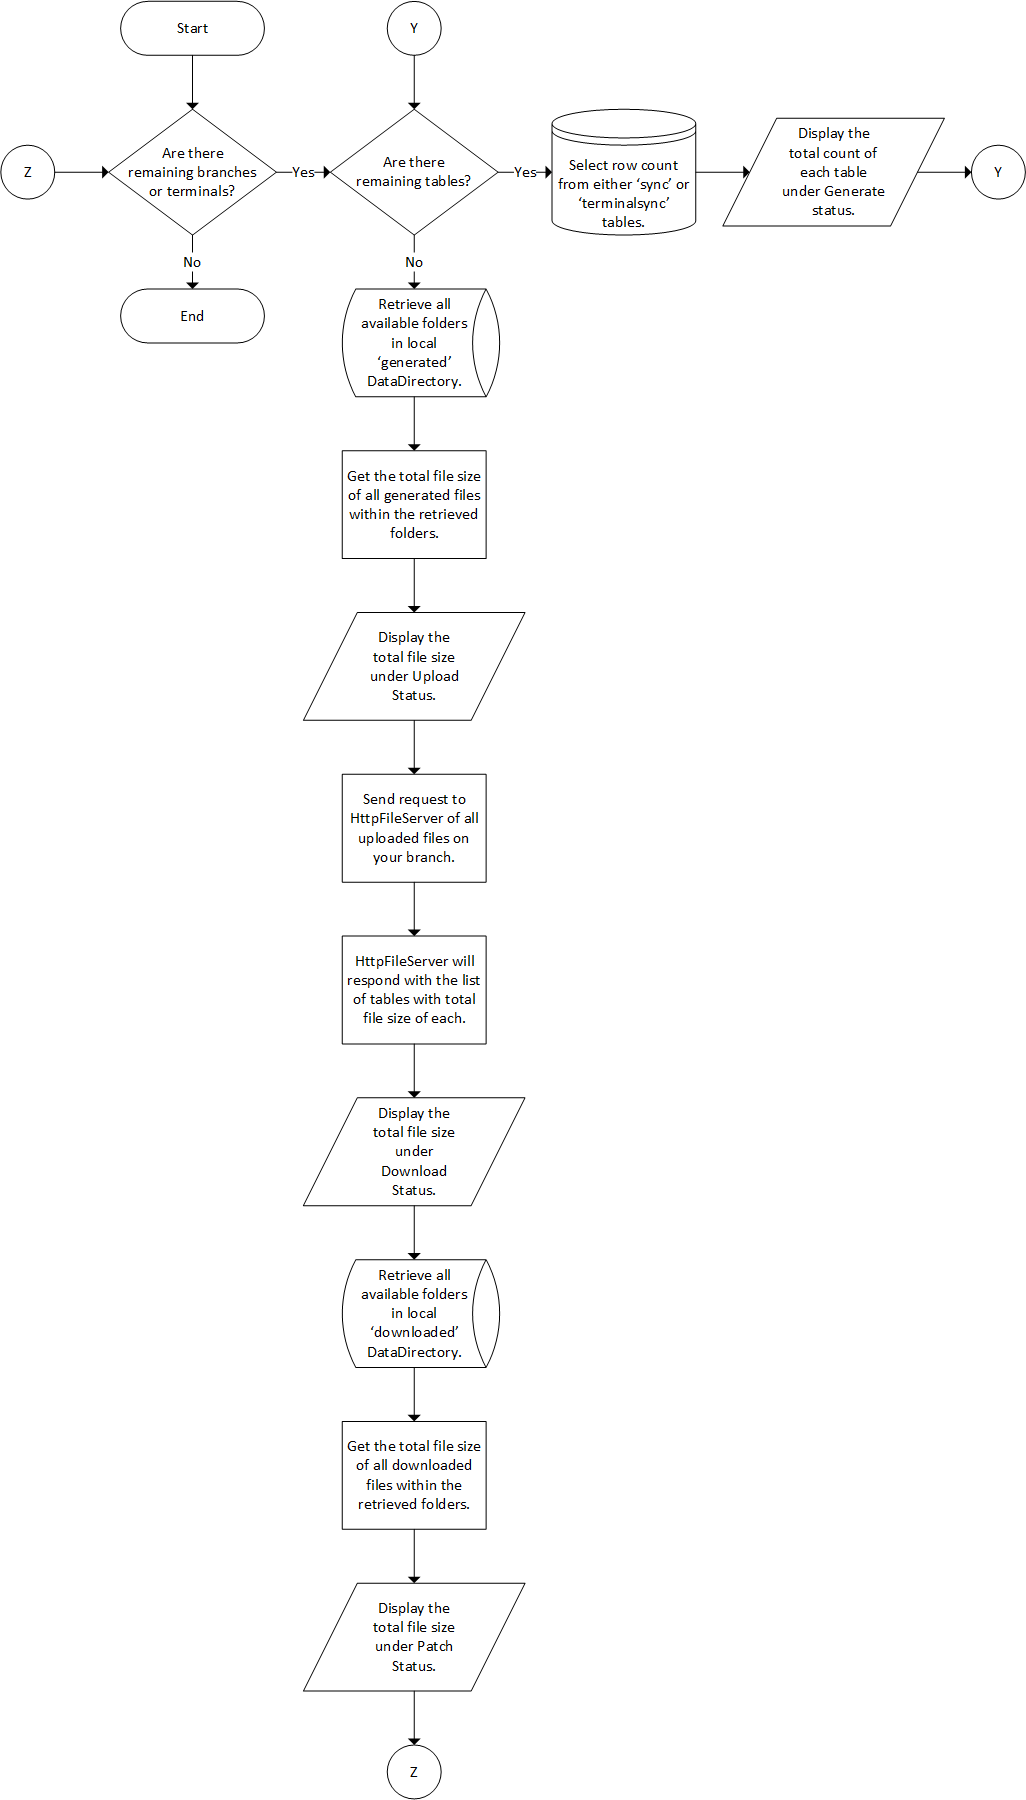
The diagrams below show the general flow for the whole process of using the ManualSync and its tools.

Diagram 1: Flowchart of ManualSync with Generate/Upload & Download/Patch buttons.

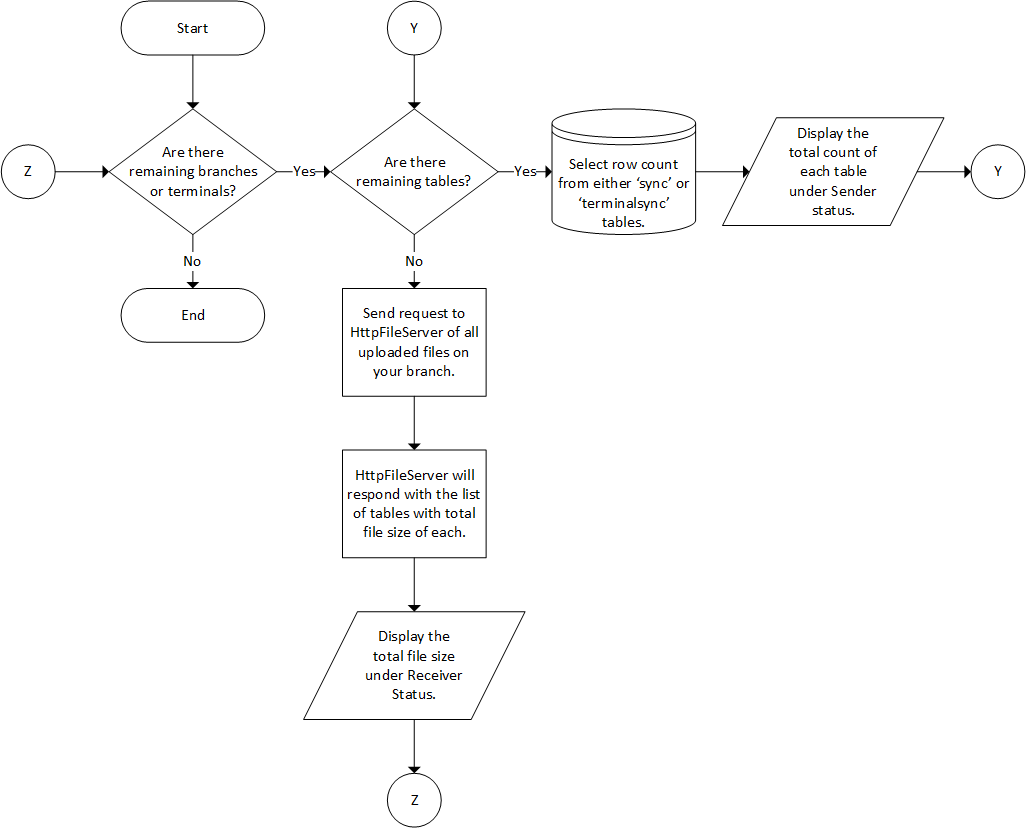
Diagram 2: Flowchart of ManualSync with Send/Receive buttons.
Detailed Flow
This section shows the detailed flowchart with algorithm of every tool in ManualSync.
Refresh Process
If <ManualSyncMode> = 0:
- Loop through each available branches or terminals for syncing.
- On DataFetcher status (Generate)
- Loop through each available tables for generating process.
- Select row count from either ´sync´ or ´terminalsync´ tables.
- Total count for each table will be displayed.
- Loop through each available tables for generating process.
- On DataUploader status (Upload)
- Retrieve all available folders in local 'generated' DataDirectory. (Note: Each folder is named after TableNames.)
- Get the total file size of all generated files within the retrieved folders.
- Total file size for each table will be displayed.
- On DataDownloader status (Download)
- Send request to HttpFileServer of all uploaded files for your branch.
- HttpFileServer will conveniently respond with the list of tables with total file size for each.
- Total file size for each table will be displayed.
- On DataPatcher status (Patch)
- Retrieve all available folders in local 'downloaded' DataDirectory. (Note: Each folder is named after TableNames.)
- Get the total file size of all downloaded files within the retrieved folders.
- Total file size for each table will be displayed.
- On DataFetcher status (Generate)
If <ManualSyncMode> = 1:
- Loop through each available branches or terminals for syncing.
- On DataSender status (Send)
- Loop through each available tables for sending process.
- Select row count from either ´sync´ or ´terminalsync´ tables.
- Total count for each table will be displayed.
- Loop through each available tables for sending process.
- On DataReceiver status (Receive)
- Send request to HttpFileServer of all uploaded files for your branch.
- HttpFileServer will conveniently respond with the list of tables with total file size for each.
- Total file size for each table will be displayed.
- On DataSender status (Send)
NOTE: If there are a lot of data to be processed, the software refreshes by batch for every 100,000 of data.
Generate Data
- Retrieve a list of wids from ´sync´ or ´terminalsync´ table given the TableNode and target branch.
- GetDataRecursive
- Check if current Table in progress exists.
- Generate a specific SQL query for the table using the criteria given by the TableNode of the current table. (These criteria includes 'WHERE' arguments, BranchPrice filters (if Product module) and specifying composite unique keys.)
- Select the actual DataTable using the retrieved wid list as reference keys and the generated SQL query.
- Filter the actual DataTable based on its ´frombranchid´ and ´tobranchid´ columns. (Stockdelivery module special condition)
- Repeat this GetDataRecursive process for all children TableNodes if there are any.
- Consolidate all DataTables of each recursive process into a DataSet.
- Return the DataSet as 'DataPack' which also contains the list of wids, and the table name.
- Serialize the 'DataPack' into a json string.
- Compress the json string into a bin file and save it into 'DataDirectory' fetched folder. (filename format is sync_<generated timestamp>.bin)
- Decompress and de-serialize the generated file to check if it is not corrupted.
- If all process succeeds, delete the list of wids in the ´sync´ table.

NOTE: If there are a lot of data to be processed, Manual Sync generates data by batch for every 100,000.
Upload Data
- Retrieve a list of generated files from 'DataDirectory' fetched folder given the TableNode and target branch.
- Generate the directory hierarchy where the files will be uploaded into the HttpFileServer.
- Request access to HttpFileServer and upload the generated file given the generated directory hierarchy.
- If the upload process succeeds, delete the uploaded file in your local 'DataDirectory'.

Download Data
- Generate the directory hierarchy where the source files from HttpFileServer will be downloaded.
- Request access to HttpFileServer and get the available files to be downloaded given the generated source directory hierarchy.
- If a file exist, download the file and save it into your local 'DataDirectory' downloaded folder.
- Create a copy of the downloaded file and Deserialize it to check if it is not corrupted.
- If the download process succeeds, execute a request to HttpFileServer to move the remote file to the cloud server's downloaded directory.

Patch Data
- Retrieve a list of downloaded files from 'DataDirectory' downloaded folder given the TableNode and the sender branch info.
- De-serialize the retrieved file and extract the 'DataPack'.
- PutDataRecursive (Pass the DataSet and reference keys inside the 'DataPack')
- Select the DataTable of the current Table from the DataSet.
- Filter the DataTable using the criteria and special conditions given by the TableNode of the current Table.
- Repeat this PutDataRecursive process for all children TableNodes if there are any.
- Delete existing local database entries using the given reference keys to avoid duplicate rows.
- Insert the filtered DataTable to local database.
- PropagateData
- If the SyncType of the current Table requires the patched data to be synced to existing terminals or other branches, insert the Table name, reference keys and the destination branch ID to your ´sync´ table.
- If all process succeeds, delete the downloaded file from your local 'DataDirectory'.

Backup Database
- Click Backup Database under Tools tab.
- A warning appears to run this tool only when there's no POS online.
- If you want to continue, click Yes then proceed to next step. Else, click No then, end process.
- Input password.
- If password is correct, do the following process:
- Get every table in the database.
- Compress all the tables into a zip file.
- If the maximum backup count has been reached, delete the oldest database backup.
- Copy the zipped file to the indicated backup directory.
- If there is a second backup directory, copy the zipped file to the second backup directory.
- Display "Backup database successful!"

Reset Inventory to Zero
- Click Reset Inventory to Zero under Tools tab.
- A warning appears to run this tool only when there's no POS online.
- If you want to continue, click Yes then proceed to next step. Else, click No then, end process.
- Input password.
- If password is correct, do the following process:
- Re-compute inventory process.
- Select each product and its current inventory in the database.
- If the product has current inventory of 0, skip the product. Else, continue.
- For every product, multiply the current inventory to -1 to negate the value.
- Then, add the result to the current inventory to get new inventory, which is 0.
- On product inventory adjust table, list every product with its old inventory and new inventory.
- Re-compute inventory, again.
- Display "Reset inventory value to zero successful!"

Recompute Inventory
- Click Recompute Inventory under Tools tab.
- A warning appears to run this tool only when there's no POS online.
- If you want to continue, click Yes then proceed to next step. Else, click No then, end process.
- Input password.
- If password is correct, do the following process:
- If main branch, delete main branch's product branch inventory and product transaction summary.
- If sub branch, delete all data in product branch inventory and product transaction summary.
- Recompute all data in all modules that reflect the products' inventory. (Modules: purchase receive, purchase return, sales, sales return, stock delivery, stock receive, product inventory adjust, damage)
- Insert the total data transacted for the day in each module in product transaction summary.
- Insert the updated inventory of products in product branch inventory.
- Display "Recompute inventory successful!"

Frequently Asked Questions
Things to Remember
- The client network id and branch id in settings should match with the values in config table.
- When performing backup database, reset inventory, or recompute inventory, make sure that there are no POS currently running on the database.
- It is recommended to set the folder path for Data Directory in \ProgramData\Autosync but a different drive from C
- For example, D:\ProgramData\Autosync
- The same with FileServerRoot folder; it should be in a different drive but C.
- If the folder path set on backup directory does not exists, Manual Sync will create the folder when it backs up the database.
Possible Issues to be Encountered
- Corrupted data
- This happens when the unit has shut down while sending data. This issue mostly happens when Manual Sync Mode is set to 0, but it can still happen when the mode is set to 1.
- Mismatched versions
- The database version of the branch might not be updated and does not match with the version of other branches.
- "Rollback: successful" error
- This is an old bug that happens when data was sent with blank details.
- For example, a user created an invoice with no details, and it was sent using the Manual Sync. The application cannot handle when there are no rows in the table which are supposed to be the details of that invoice.
- This error can occur when one branch tries to send files to another branch that has a different product sync mode value from it.
- This is an old bug that happens when data was sent with blank details.
- Stock Delivery issue
- This issue occurs when old data overwrites the newer data in branches involved in the transaction and in third party branches (branches not in the frombranchid and tobranchid fields).
- This has been fixed recently but is still being monitored, in case the issue occurs again. It now bases on last modified date.
- Not all products get synced sometimes
- Third party issue
- .bin file gets blocked by antivirus
- Unable to send or receive
- This happens when the user has no permission to do the action.
Software Limitations
ManualSync is a faster and more reliable software especially when it comes to its syncing process. It also allows users to perform syncing and database backup whenever is applicable to them. But even with all the improvements made in this software, it still has its limitations.
- The Manual Re-sync feature is disabled in this software unlike in AutoSync v4. A user should be able to view another branch's data when going to use the Manual Re-sync feature. In AutoSync v5, there is no access to another branch's database.
Software Change Log
You can find the change log of Manual Sync on this link.