Queue Management Developer Manual
Table of Contents
- Version Compatibility
- About Queue Management
- Features and Functionalities
- Process Flow
- Frequently Asked Questions
Version Compatibility
The table below shows the minimum version of the Queue Management software, test case specification, and SQLite compatible with the version of this document.
| System Document | Test Case Specifications | Queue Management Software | SQLite |
| 1.0 | 1.0 | 1.0.0.0 | 3.27.2 |
| 2.0 | 1.0 | 1.0.0.0 | 3.27.2 |
The Test Case Specifications can be found here.
About Queue Management
System Summary
The queue management software helps users to line up the orders from their customers sent from the POS. The users can move the queued orders from 'Now Preparing' to 'Now Serving' to 'Done'. The customers can also view the queueing real time on another screen but with only 'Now Preparing' and 'Now Serving' panels.
System Requirements
Below are the dependencies needed for the latest version of Queue Management software to work properly:
- Target Framework: .Net Framework 4.7.2
- Platform Target: Any CPU, 32-bit or 64-bit
- Operating System: Windows 7 SP1
- Packages & Libraries:
- Newtonsoft.Json v12.0.2
- SQLite v1.0.111.0
- Dapper v2.0.30
- Costura.Fody v3.3.3
- Fody v6.0.0
The following are the safest minimum hardware requirements for Queue Management:
- At least 4GB RAM
- For screen resolution:
- 1024 x 768 for User View
- 1280 x 720 for Customer View
Features and Functionalities
This section discusses the functionalities and uses of the Queue Management software.
Main Features
The Queue Management software is able to store the queue numbers without losing data even on forced shutdown of unit. Its settings is accessible directly through the software. It also uses C# sockets for the communication between POS and this software.
The Queue Management software has two screens. One for user view and the other view is for customers. Both of the screens now use a standard layout, and their design (main logo, background color and image, font style and color) can be configured based on client's preference.
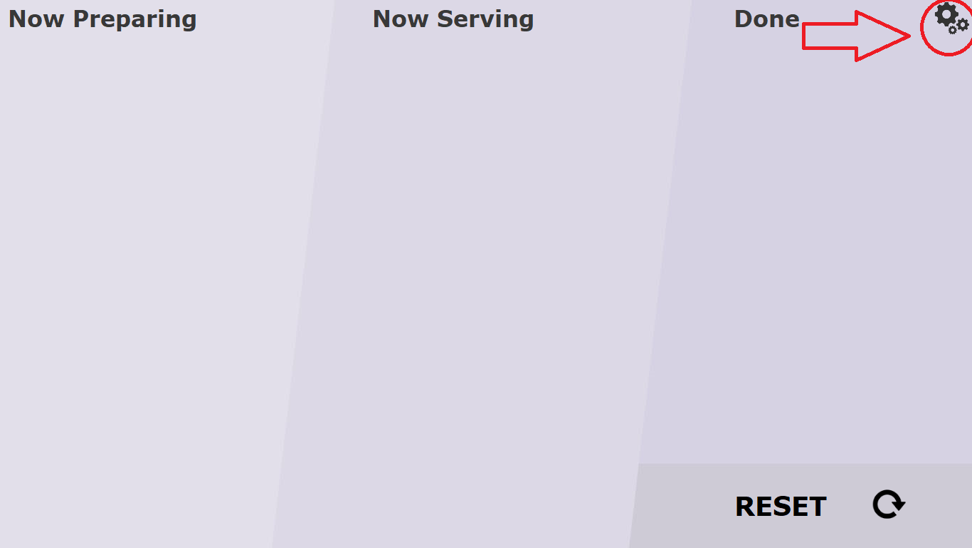
Below is the User View:

- The Now Preparing panel is where the queue numbers from POS are transferred to automatically.
- The Now Serving panel is where the queue numbers are moved to when the order of customer is done and complete. Queue numbers under this panel can be moved to Done panel or back to Now Preparing.
- The Done panel is where the queue numbers are moved to when the order of customer has been served to them. Only five numbers are shown on this panel; older numbers are hidden.
- This Reset button clears the queue numbers in all panels.
- The numeric keypad is used by users for managing the software. The button shortcuts work whether the Num Lock key is turned on or off.
- Button 4 (left) is used to move selector to the left of current panel.
- Button 6 (right) is used to move selector to the right of current panel.
- Button 8 (up) is used to move selector to previous number in the queue of current panel.
- Button 2 (down) is used to move selector to next number in the queue of current panel.
- When the selector is moved to another panel, it automatically selects the first number in its queue list.
- The Enter key is used to move the selected queue number to the next panel. For example, from Now Preparing to Now Serving or from Now Serving to Done.
- The Del key is used to move the selected queue number to the previous panel. For example, from Done to Now Serving or from Now Serving to Now Preparing.
- When a queue number is moved to the next panel, the next number in current panel's queue is selected.
- When a number is moved back to its previous panel, it is returned to where it was in the queue.
- The plus (+) key is used to manually input a queue number. The number will be added in the Now Preparing panel.
NOTE: Users can switch to a different window by using the Alt + Tab keys.
Below is the Customer View:

This screenshot is an example of Customer View showing images in the image slider.
- There are only two panel in customer's view: Now Serving and Now Preparing
- For this view, both panels can display the numbers in 2 columns and 7 rows for each.
- The Done panel is hidden from this view.
- A sound is played when a queue number is moved from Now Preparing to Now Serving.
- The logo image which is located on the upper right of the view can be changed if the client wants to.
- This view can have an image slider if the client wants to. The image slider is located on the lower right part of the view. A folder, where they can put the images, will be generated when the software is opened for the first time.
- The images folder location: C:\Users\Public\Documents\Queue Management\Images
- The image slider allows these file formats of the images: jpg/jpeg, png, bmp.
The In-App Editor
The application's in-app editor is for customizing the User View and Customer View according to the preferences of the user that they can set themselves. This can be accessed in the User View through the gears icon located on the topmost right corner as shown below:
There are two tabs in the editor, one for Customer View and one for User view.
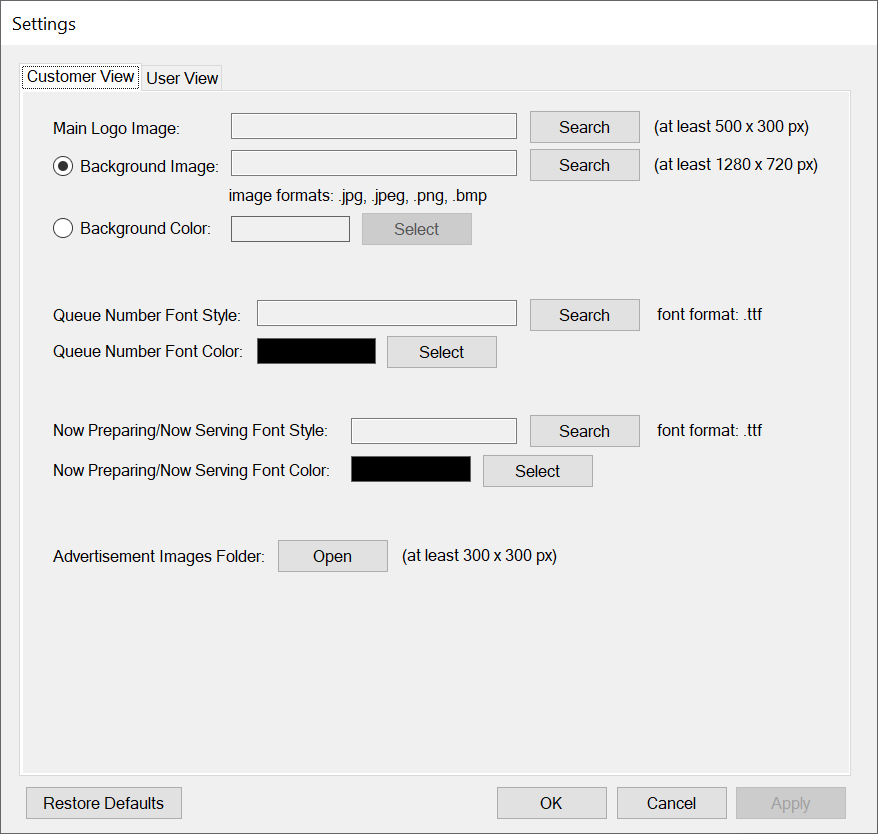
- Main Logo Image - This is where users can set the logo image to be displayed on the upper right part of the Customer View. The minimum allowed image dimension is 500 x 300 pixels. The only allowed filed formats are jpg, jpeg, png, bmp.
- Background Image - This is where to set the background image of Customer View. If this is selected, Background Color setting will be disabled since only either of the two can be used. The minimum allowed image dimension is 1280 x 720 pixels.
- Background Color - This is where to set the background color of Customer View. If this is selected, Background Image will be disabled since only either of the two can be used.
- Queue Number Font Style - This sets the font style of queue numbers displayed on Customer View. The only allowed font format is tff.
- Queue Number Font Color - This sets the color of queue numbers displayed on the screen.
- Now Preparing / Now Serving Font Style - Users can set the font style of "Now Preparing" and "Now Serving" here for Customer View. The allowed font format is tff.
- Now Preparing / Now Serving Font Color - Users can set the color of "Now Preparing" and "Now Serving" here for Customer View.
- Advertisement Images Folder - The Open button beside this only opens the folder where the images in image slider are stored. Any changes made in the said folder will take effect only after restarting the application. The allowed dimension for the images should be at least 300 x 300 pixels.

- Background Image - This is where to set the background image of User View. If this is selected, Background Color setting will be disabled since only either of the two can be used. The minimum allowed image dimension is 1024 x 720 pixels.
- Background Color - This is where to set the background color of Customer View. If this is selected, Background Image will be disabledsince only either of the two can be used.
- Now Preparing / Now Serving / Done Font Style - This sets the font style for "Now Preparing", "Now Serving", and "Done". The allowed font format is tff.
- Now Preparing / Now Serving / Done Font Color - This sets the color for "Now Preparing", "Now Serving", and "Done" on User View.
- Queue Number Font Style - This sets the font style of queue numbers on all panels. The allowed font format is tff.
- Queue Selected Box Color - This sets the box color of a queue number when it is selected.
- Queue Preparing Font Color - This sets the font color of queue numbers under Now Preparing panel.
- Queue Serving Font Color - This sets the font color of queue numbers under Now Serving panel.
- Queue Done Font Color - This sets the font color of queue numbers under Done panel.
- Queue Preparing Box Color - This sets the box color of queue numbers under Now Preparing panel.
- Queue Serving Box Color - This sets the box color of queue numbers under Now Serving panel.
- Queue Done Box Color - This sets the box color of queue number under Done panel.
- Reset Font Style - This sets the font style of the Reset button. The only allowed font format is tff.
- Reset Button Image - This sets the background imaged of Reset button. The allowed file formats are jpg, jpeg, png, and bmp.
- Users can save their changes on the editor by clicking the Apply button. The changes will take effect after clicking the OK button which restarts the application showing the applied changes.
- If the user made changes and clicked the “OK” button without clicking “Apply,” a prompt will appear that asks the user to confirm the changes. Clicking “Yes” will restart the program with the applied changes. Clicking “No” will send the user back to the Settings window.

- If the user made changes and clicked the “OK” button without clicking “Apply,” a prompt will appear that asks the user to confirm the changes. Clicking “Yes” will restart the program with the applied changes. Clicking “No” will send the user back to the Settings window.
- The Cancel button is only enabled when a user made changes, and when it is clicked, it closes the editor and cancel all changes made. This button becomes disabled when the Apply button is clicked.
- The Restore Default button will revert all settings to their default values. The changes will only take effect after clicking the Apply or OK button.
Software Settings
A subfolder named "Queue Management" will now be saved inside the main folder where QueueMgmt.exe application file is located. If the subfolder "Queue Management" is non-existent, then it will automatically be created upon opening the executable file.
Inside the "Queue Management" folder, there contains a "Settings.txt" where a user can configure the desired images, font style and font colors to use in Customer View and User View. The following settings include:
- MainLogoPath - Set here the full path of the main logo image file (NOTE: If path is non-existent, the main logo in the Customer View will appear blank)
- Customer_BackgroundImagePath - Set here the full image file path for Customer View (NOTE: If path is non-existent, the application will instead use the background color set below)
- Customer_BackgroundColor - Set here the background color for Customer View
- Customer_QueueNumberFontStyle - Set here the full file path of queue numbers font style for Customer View (NOTE: If path is non-existent, the application will use a generic sans serif font)
- Customer_QueueNumberFontColor - Set here the font color of queue number in Customer View
- Customer_NowPreparingFontStyle - Set here the full file path for font style of both "Now Preparing" and "Now Serving" in Customer View (NOTE: If path is non-existent, the application will use a generic monospace font)
- Customer_NowPreparingFontColor - Set here the font color of "Now Preparing" and "Now Serving" in Customer View
- User_BackgroundImagePath - Set here the full image file path for User View (NOTE: If path is non-existent, the application will instead use the background color set below)
- User_BackgroundColor - Set here the background color for User View
- User_NowPreparingFontStyle - Set here the full file path for font style of both "Now Preparing" and "Now Serving" in User View (NOTE: If path is non-existent, the application will use a generic monospace font)
- User_NowPreparingFontColor - Set here the font color of "Now Preparing" and "Now Serving" in User View
- User_QueueNumberFontStyle - Set here the full file path of queue numbers font style for User View (NOTE: If path is non-existent, the application will use a generic sans serif font)
- User_Queue_PreparingBackColor - Set here the background color of queue numbers at the "Now Preparing" panel in User View
- User_Queue_ServingBackColor - Set here the background color of queue numbers at the "Now Serving" panel in User View
- User_Queue_DoneBackColor - Set here the background color of queue numbers at the "Done" panel in User View
- User_Queue_PreparingFontColor - Set here the font color of queue numbers at the "Now Preparing" panel in User View
- User_Queue_ServingFontColor - Set here the font color of queue numbers at the "Now Serving" panel in User View
- User_Queue_DoneFontColor - Set here the font color of queue numbers at the "Done" panel in User View
- ResetFontStyle - Set here the full file path for font style of "Reset" in User View (NOTE: If path is non-existent, the application will use a generic monospace font)
- ResetButtonImagePath - Set here the full image file path for reset button (NOTE: If path is non-existent, the application will instead use a default reset button design)
Users can use any of the 147 color names listed on Note.txt file which is also inside the "Queue Management" folder. They can also use any 6-digit hexadecimal color code (ex. "383838" for DarkGray, "1C8981" for a shade of blue green). If the user used none of the allowed color values listed, the application will set the color to Black.
Another folder named "Queue Management" will now be saved at C drive (C:\Users\Public\Documents\Queue Management) which will contain subfolders "Fonts" and "Images"
- Subfolder "Fonts" will store the files of custom font style (as long as file format is .TTF) that the user desires to apply in the application design.
- Subfolder "Images" will store image files that user desires to use for the main logo, slide show images in customer view, backgrounds for customer view and user view.
- In this subfolder, another subfolder named "SliderImages" will store image files for the slide show in customer view.
Sending of Queue Numbers from POS to Queue Management
This part shows the process of entering queue numbers from POS to the queue management software.
- Make sure the Queue Management software is open to be able to send the queue numbers.
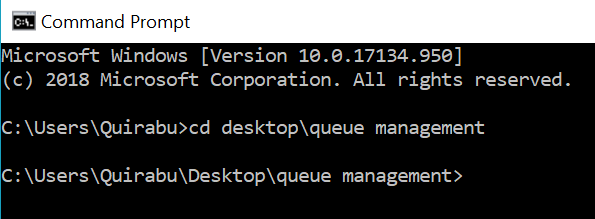
- Open command prompt.
- Change the directory to the folder location of Client.exe. See example below.
- Then, input "client <ip address> <queue number>". If local, input "client <queue number>". See example below.
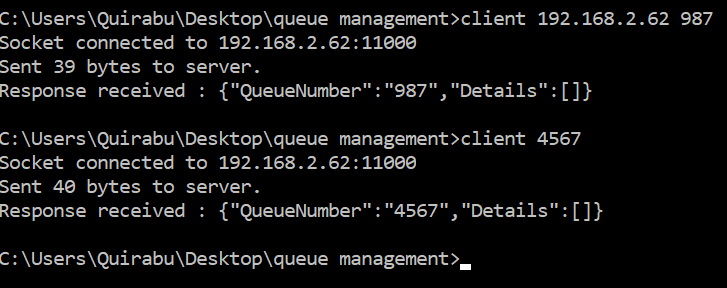
NOTE: The queue number can be 3 - 4 digits only, less or more than that will not be accepted.
Process Flow
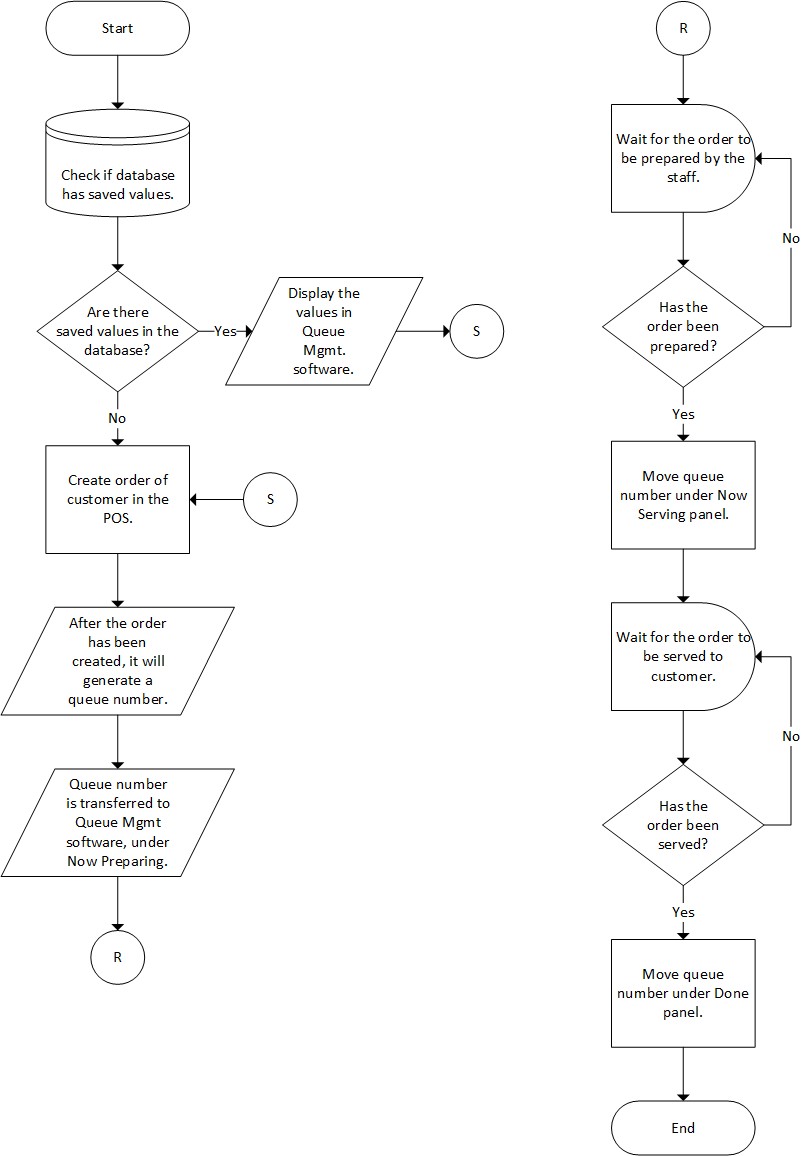
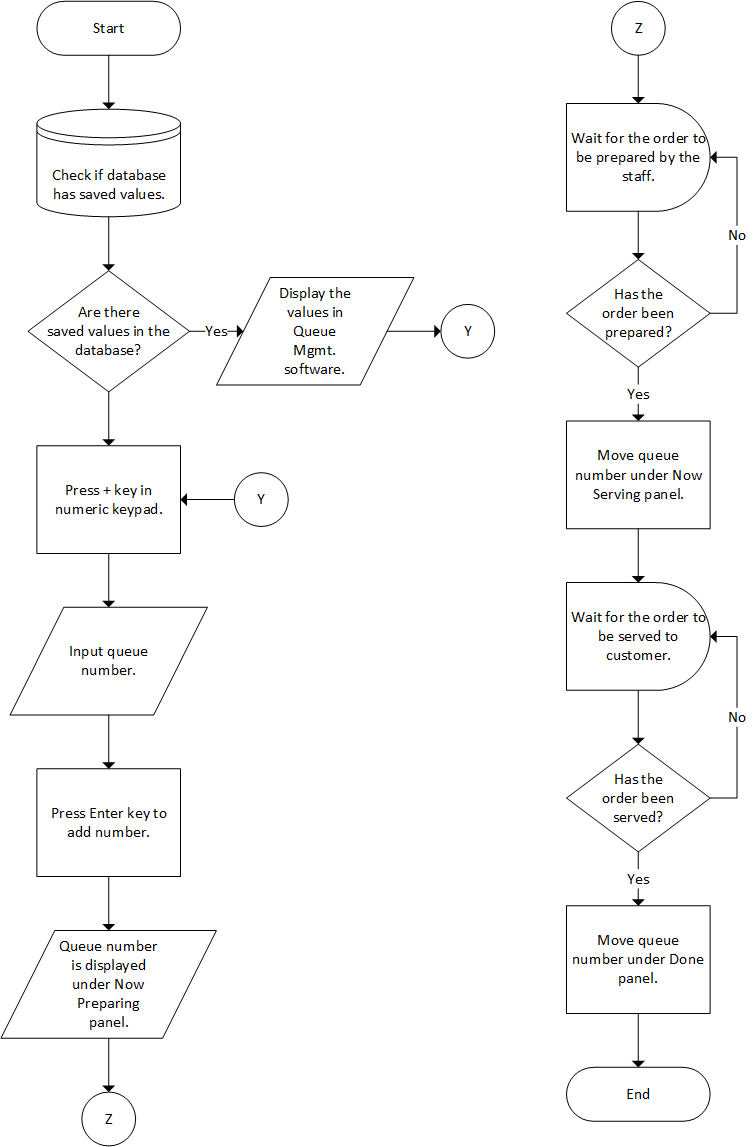
The diagrams below show the flow of the whole process of using the Queue Management software in two ways.
Queue Number From POS
Manual Input of Queue Number
Frequently Asked Questions
Things to Remember
- When the Num Lock key is off, the numeric keypad can be used for moving the selector or the queue number to another panel, but it cannot be used when manually inputting a queue number.
Possible Issues to be Encountered
- Application not working
- This issue may happen when there's not enough storage and when database is full due to not clearing or resetting data.
- Application is slower than usual
- This happens when database is full due to not clearing or resetting data. Another cause may be there's not enough storage or not enough RAM to properly accommodate the software.
- Disrupted display
- This occurs when an extended display is not used or when the screen resolution is lower than the minimum given in System Requirements.
- The recommended value for scale and layout is 100%. When the value is higher than 125%, the display becomes disrupted.
- Unable to enter order / move order
- This may happen when the numeric keypad is not working properly.
- Numeric keypad is working but unable to add order
- This happens when the Num Lock key is off, and user tries to manually input a queue number with plus (+) key on the keypad.
Software Limitations
- Only 3 - 4 digits are accepted for queue number.
- Only one instance of the software can be opened.
- The allowed file formats for the image slider are png, jpg, jpeg, bmp.